Berlin, Germany is one of the most exciting and visited cities in the world. I was very proud to have lived there for 7.5 years and during those years my cake baking and decorating blossomed.
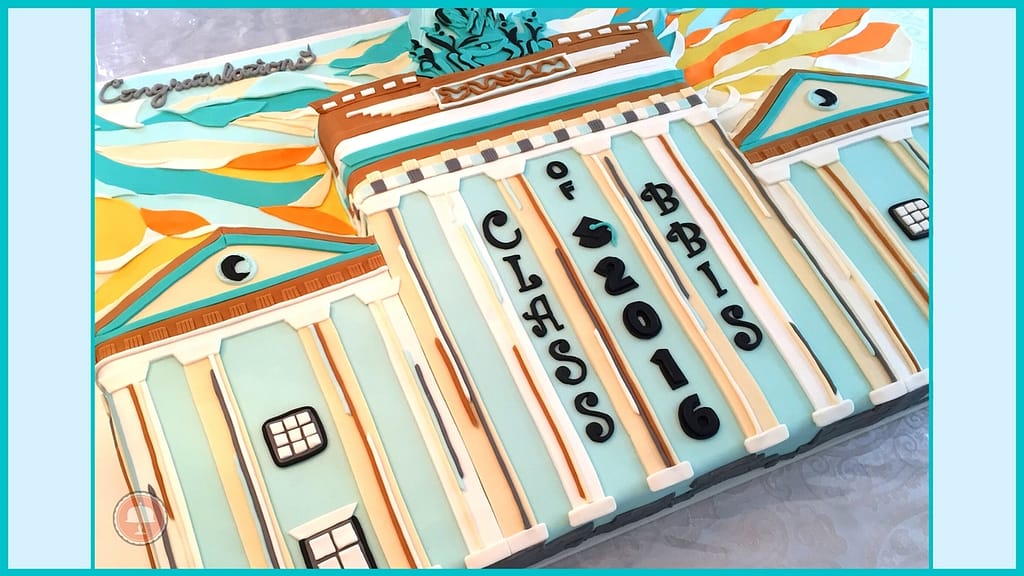
This Iconic Graduation Cake – Class of 2016 Brandenburg Gate was not only the largest cake I had done at the time but a cake of design accomplishment.

I attribute my interior design background to scaling the layout of the Brandenburg Gate for the cake measurements and servings with the cake board. It was certainly a challenge, there were some adaptations, but I think it turned out well considering all the variables.

Graduation Cake
It was my first time doing a cake of this size, of this nature, all the fondant spacing, fondant detail, color scheme, and executing the gate scale in conjunction with the board size.
This was not just any Cake Board bought in a store. There would be no such board size to buy. I actually bought a white plywood laminated shelf that would be large and sturdy enough to support my cake to serve 300+ people.
Instead of just doing the main Brandenburg Gate I included the two side buildings. Haus Liebermann and Haus Sommer. Each was built in the late 1990s by architect Josef Paul Kleihues to replace the pavilions that were destroyed during World War II.
Since the cake is flat the point of view is looking straight on at all three entities spaced closer together. No room for the side halls so I took them out. I also had to make the gate a little taller instead of wider. Adjustments had to be made.

For this Iconic Graduation Cake, I chose a sun setting color scheme. Looking at professional photos helps. I’ve taken countless pictures of the Brandenburg Gate so I referred to those as well. Inspiration can come from anywhere.
Color Scheme

With a cake this big I needed several colors to add depth as there was much space to cover.
It’s important to know how many colors you’ll be working with because it’s all about planning and organization. A lot of fondant was used to cover and decorate this cake and mapping which color goes where was essential.
Sketching and using colored pencils or markers will help you visualize how your cake will look.
NEW! – also be sure to check out my latest How-To Guide on creating a color palette for your next cake design.
Crumb coat, frosting, and fondant base layer

After shaping, cutting, crumb coating (a thin layer of frosting to seal the cake and crumbs), with added final frosting coat it was time for the base fondant layer. This cake was initially covered with 3-4 thinly rolled-out large fondant pieces to be the base layer.
This was important because I needed that base layer to attach the other decorative fondant layers and details. The final decorative look is rarely the base layer itself. The fondant used was vanilla and caramel flavor. Yum!
Fondant Cake Toppers – letter press
Most fondant cake toppers can be made prior to cake making day. This allows the fondant time to set and dry. Naturally, it depends on what you are making and if you need the cake toppers to be firm and dry or soft and tacky for application.
The lettering can be rolled and cut close to applying the topper to the cake. When using a letterpress tool the fondant must be rolled out thin. If you roll it too thick each letter will be harder to cut. Then if needed take a sharp knife and cut the letters clean-edged for application.
Fondant Cake Ideas

Remember, every cake is a learning experience. It may not always turn out perfect but that’s ok-it doesn’t have to be. I learned so much from this bad boy that I actually did another one the following year. See my Historic Graduation Cake Ideas – Class of 2017 Brandenburg Cake.

Check out my other fondant cake ideas posts which will sure to keep those creative juices flowing!


