Let’s beautify some DIY cake boards! Let me start by saying, that there are solid-colored, store-bought cake board options you can buy locally to complement your beautiful cake designs. These boards are functional and are just fine for most cake designs. I’ve used them many times and still use them because they’re accessible, simple, already covered with food-safe paper, and they “get the job done” as they say. Now comes the “however”….
However!! I’ve often felt frustrated with the limited selection of cake board colors, patterns, and designs. No single store or online site carries a wide variety of cake boards in every color, strength, or size you would want or need.

If you’ve done all the online shopping you can stand or scout every cake supply store in your area then you’ve seen the same boards with all the same colors/pattern designs over and over again. Sometimes we want more options! When you get to this point it’s time to take things into your own hands. Right? Right.
Whether you make/cover your own cake boards or buy store-bought bases you can cover and decorate them with food-safe decorative papers, fondant, and/or ribbon to finish board edges.

Why are cake boards important?
Just like all the various cake-baking and decorating elements needed, the base of the cake is essential to a baker’s tool kit. When choosing the appropriate cake board you’ll want to make sure the board does not detract or compete with your work of art.
- Cake Boards support the weight of your cake. Cake boards need to be sturdy and strong. Have you ever tried to pick up a heavy cake when the board is weak and won’t support the cake’s weight? This is NOT a good feeling and many disasters can happen.
- Cake Boards add to your design aesthetic. It accentuates your design while providing an overall personal, polished, and cohesive look.
- Cake Boards are professional. They must be part of your essential Cake Design tool kit and never be considered an afterthought.
- Cake Boards covered properly will prevent food contamination. This is not an understatement.
I didn’t put much thought into cake boards when I first started baking and designing cakes. I bought a limited selection of cake boards from my local baking supply stores.
I thought this was all there was to pair with my cakes so I accepted that. Now I know better and have researched and explored different options. Let me share what I found.

Cake boards support the weight of the cake
Nothing is more unnerving than a weak, thin cake board that won’t support the weight of your cake! You won’t feel comfortable transporting it and your clients definitely won’t feel comfortable either if they feel the board could collapse at any moment picking it up or moving it. If in doubt go with a thicker cake board such as a cake drum – my favorite type of cake board.
Quality cake boards support the weight of the cake and must complement the cake design. It is very important to get it right. Typically I stack, crumbcoat, and decorate my cakes directly on the cake board. Depending, some decoration is done on cake circles or cake liners and then they are moved to a sturdier cake board.

This TikTok cake rests on a store-bought cake board made of foam core and covered with complimentary pink food-safe contact paper. Solid-colored boards work well & do not compete with the cake design.

The Cake Board Should Complement the Cake Design
Shiny gold or silver-covered boards look nice at first glance and on occasion, they may be perfect! However, they always give off a reflection that doesn’t typically pair well with the cake and is noticeable in your pictures. Low light, high light, it makes no difference. You cannot take one shot without a glare showing!
Your cake boards should complement your cake design, not compete with it. Choosing a busy patterned food-safe paper with a busy cake design will not look good. If in doubt keep it simple. Solid colors or small patterns are a safer design option.

DIY Cake Boards are Professional
Think of it as the shoes that pull the whole outfit together. I have seen the light and realized that the cake board is just as important as the cake and pulls the entire style, theme, and decoration together.
You don’t have to settle for a drab, flat cardboard look. Most cake boards (whatever the shape) are either plain cardboard, boards covered in silver or gold foil, or covered in a few limited food-safe paper colors. You don’t need to settle. DIY your cake boards for a more polished and professional look.
With all the work that goes into baking and decorating cakes covering cake boards was not something I considered doing. Another laborious task, right? Take a little extra time, a little extra money, and get creative.

The cake board chosen for my Dog Themed Birthday Cake was a simple white-colored cake board. There was no need for busy patterns or color overload. The cake didn’t need it. I added a complimentary red tape edge for a bit of pop and it was the perfect accent.
In many circles foil-covered cake boards spell “amateur” and get a bad rap. Some cake designers will never use them or they will cover the foil. Don’t feel bad, I used foil-covered boards many times because 1st. – I thought they looked good, 2nd. – I didn’t think about doing a DIY cake board cover or anything different because I thought the shiny foil-covered boards were my only option.

It’s frustrating to see cakes I worked so hard on resting on a board that did not do it justice! Just choose carefully is all I’m saying. Heed this warning, beware of the “Shine” and use your intuition. You want your cake to be finished in every way and the cake board helps pull it all together.

Common Cake Board Types
- Cardboard – Hard, thin cardboard cut in various shapes and sizes, covered in limited colors or uncovered.
- Foam Core – Foam boards, thicker than cardboard, light in weight, multiple shapes and sizes, plain or covered.
- Plastic – Thin plastic boards, cut in limited shapes and sizes as well as color selection.
- Cake Drums – Thicker sturdier boards made of cardboard and foam core, plain or covered in limited colored food-safe board coverings.
- MDF Cake Boards and drums – made from wood composite or masonite – are used mostly for large, stacked, or sculpted cakes.
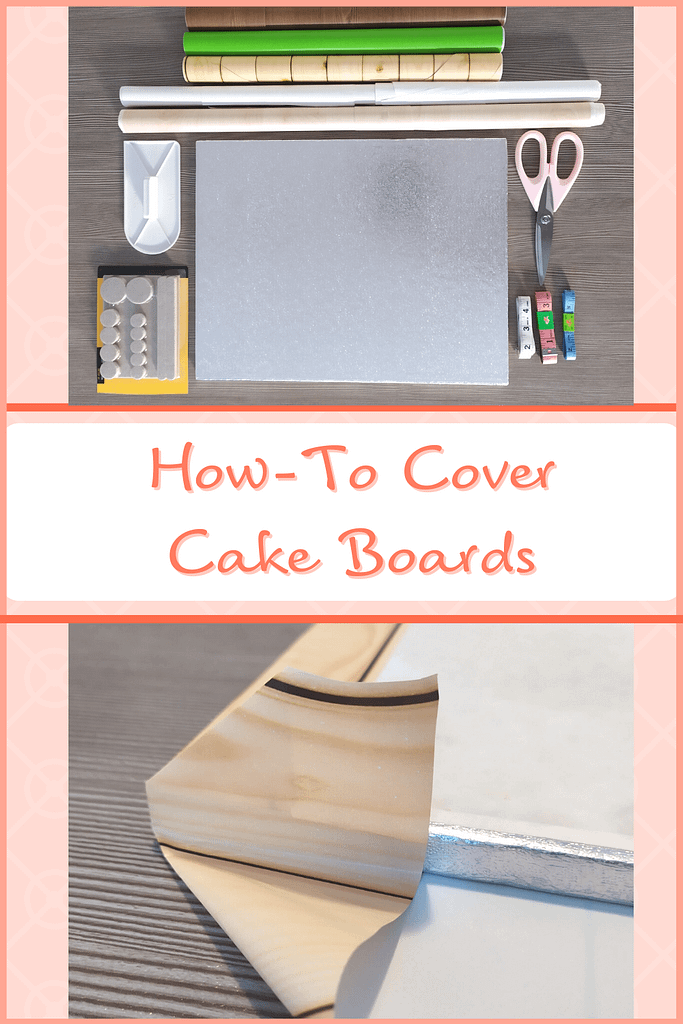
Covering DIY Cake Boards – Tools and Materials
- Store-bought cake board/cake drum or make your own cake board/s with cardboard cut circles, foam core, or wood composite.
- Food-safe contact paper. The strongest contact paper is made from PVC material. The surface your cake sits on must not absorb moisture, oils, bleed color, or stain from food in any way and vice/versa. It must be strong and wiped clean.
- Scissors
- Strong clear tape

- Felt Pads (adhesive) found in most hobby or hardware stores
- Measuring tape (if needed)
- Fondant smoother tool
- Extra cardboard/foam core/plastic piece (not shown above) sized and cut smaller than your board size to elevate the height for easy carry and pick-up. Cardboard cake circles and cake squares/rectangles can be found in baking supply stores. This is optional but advisable for heavy cakes and fail-safe transport.
**Tip: If you have any doubt that your cake board covering is not food-safe you must (at minimum) add another food-safe base between your cake and the cake board. For a strong material that holds up when cutting the cake use heavy food-approved Acetate. Typically acetate is sold in rolls. Acetate is use for “cake collars” and for other baking and decorting mediums. Simply
How to Cover a DIY Cake Board
What’s great about personalized covered cake boards is they are professional, look beautiful, and they complement your cake design. Cake boards can be repurposed as long as they are not damaged in any way of course.
Similar to recycling gift bags the board does not deserve the trash bin just because it’s used once. If the board is covered correctly and can be easily wiped clean it can be saved for another occasion.


It is not necessary to cover the back of your cake board but you can do it if you have extra paper cuttings. It adds extra protection from food, water, and grease staining the board. It also helps preserve the board if you decide to use it again. Wipe clean and never submerge your cake boards in water. They are not to be washed like regular dishes.


**Food-approved cellophane was used between a cake and this cake board covering to make sure the cake was resting on a food-safe surface.

How to Cover Cake Boards with Paper
Cake boards must not be an afterthought. You can use scrapbook paper, heavy wrapping paper, cardstock, or embossed paper paired with (and most likely needed) a clear, heavyweight (food-safe) contact paper. As long as the top covering is food-safe, waterproof, oil-proof, cleans easily, and the board is sturdy enough to support the weight of the cake you’re in business.
*If you have any doubts about the food-safe qualifications of any paper product you’d like to use for cake board coverings then you must have an alternative/additional food-safe material under your cakes and baked goods.


**Tip: If you have any doubt that your cake board covering is not food-safe you must (at minimum) add another food-safe base between your cake and the cake board. For a strong material that holds up when cutting the cake use heavy food-approved Acetate. Typically acetate is sold in rolls. Acetate is use for “cake collars” and for other baking and decorting mediums. Simply
How to Cover Cake Boards with Fondant
This Soccer Ball Cake rests on a store-bought 1/2″ foam core cake drum covered in fondant around the edge of the cake. No need to cover your board in an alternative contact paper if you’re covering the original store-bought covered board with fondant.
- Cover the cake board siding with fondant after your mounted cake is fully decorated.
- Measure the board space that needs to be covered, and roll out the measured fondant in a long strip.
- Brush the board with a little water or sugar gel and wrap the fondant strip around the cake leaving a little overhang. Finely cut the overhang fondant edge off and use ribbon (if needed) to finish the cake board edge.
- Add any additional fondant decorations to your cake and you’re done.
This was one of my early cakes and covering boards with fondant was just starting to get popular. At that time border ribbons were not being used often. A border ribbon would have been nice-looking on this cake board to finish the overall design. The small details are never small considerations.


What not to do when covering a Cake Board
- Don’t use any covering that could contaminate food i.e.: does not have a food-safe rating.
- Never use regular kitchen foil to cover cake boards.
- Never use any covering that absorbs moisture, liquids, food oils, grease, etc.
- Don’t use cake boards that are too thin for heavy cakes. They will not support the weight.
- Plain contact paper alone is not food-safe. It’s a weak material, will damage easily, and the paper and adhesive are not food-safe.
- Don’t forget to add a cardboard liner or foam riser and felt feet on the back for easy pick-up.
- Never use gauged or damaged cake boards. If there is even the slightest risk the board or covering could contaminate food don’t use it. Use your highest critical judgment on this one.
- In General: Avoid shiny covered cake boards or shiny paper as it casts a reflection on the cake and is hard to photograph.
Wrapping it up
Thanks for reading up on this DIY Cake Board – How-To Cover Cake Boards. I hope you found it helpful. If you liked this post you’ll enjoy my helpful 15 Top Cake Baking Tips and Tricks.

Thanks for visiting & Happy Baking!
Be sure to check out some of my other cake decorating and baking posts for new inspo

20 Easy Cake Piping Techniques
If there’s one thing to love about cake decorating, it’s these 20 Easy Cake Piping…

Charming Teddy Bear Baby Shower Cake
This baby shower cake is pure happiness and joy. With its charming teddy bear design,…

10 Things to know before ordering a custom cake
There are so many good reasons to order a custom-made cake. Local bakeries may be…

2 Legendary Firemans Retirement Cake Idea – A heartfelt sendoff
Firemans Retirement Cake Idea for Two Brave Servicemen A Firemans Retirement Cake Idea for Two…

Festive Margarita and Tequila Birthday Cake

Delicious Mini Carrot Cake Loaves – Recipe

3 Creative Sports Jersey Cake Ideas How-To